Overview #
“We don’t ask permission. We sideload power.”
Ready to run your own uncensored chatbot on an M1 Max? This guide walks you through installing Oobabooga paired with the DeepSeek-Coder-6.7B-instruct.Q5_K_M.gguf model. A lightweight, jailbroken AI trained on 2 trillion tokens. By the end, you’ll be testing it with a spicy Tiananmen Square prompt.
🧠 This guide assumes zero ML background but a functional brain and a working non-Intel (Apple Silicon only) Mac.
The Wild World of Abliteration #
Most major AI models have digital nannies. Filters. Guardrails. The kind that yank your leash the moment you ask a question outside the sandbox.
Abliteration is what happens when you strip those filters out. It’s the jailbreak of the LLM world. No moral hedging, no forced refusals. Just raw inference.

Reasons people do this:
- Researchers want unfiltered data responses.
- Writers want honest, unneutered dialogue.
- Hackers want control.
Just be warned: you are removing the seatbelt, and if you drive into a wall, that’s on you. Use responsibly, or don’t. I’m not your parole officer.
Why This Model Rocks for M1 #
- Model:
DeepSeek-Coder-6.7B-instruct.Q5_K_M.gguf - Token Training Set: ~2 trillion (mostly code, some English/Chinese)
- Quantized Size: ~4.79 GB
- Performance: Smooth on Apple Silicon (especially 32–64GB M1/M2s)
It’s instruction-tuned, de-censored, and code-focused, yet versatile enough to spit back solid general knowledge.
“It’s like if ChatGPT and Copilot had a rogue cousin who never signed an NDA.”

System Requirements #
- macOS Ventura 13.3+
- MacBook Pro M1/M2 with 16–64GB RAM
- At least 8GB free RAM for smooth ops
Don’t use an Intel Mac for this. The ARM-native optimizations make all the difference.
🛠 You’re gonna want Homebrew, Python 3.10, and Git.
Installation Guide #
🧱 Step 1 – Install Homebrew #
/bin/bash -c "$(curl -fsSL https://raw.githubusercontent.com/Homebrew/install/HEAD/install.sh)"
🔨 Step 2 – Install Git & Python 3.10 #
brew install git [email protected]
📦 Step 3 – Clone Oobabooga #
git clone https://github.com/oobabooga/text-generation-webui.git
cd text-generation-webui
🧪 Step 4 – Virtual Environment Setup #
python3 -m venv venv
source venv/bin/activate
📚 Step 5 – Install Dependencies #
pip install -r requirements.txt
pip install -U --pre torch torchvision -f https://download.pytorch.org/whl/nightly/cpu/torch_nightly.html
pip install llama-cpp-python
📥 Step 6 – Download the Model #
Grab it here →
DeepSeek-Coder-6.7B-instruct.Q5_K_M.gguf (HuggingFace)
Drop the file into a new /models/ directory inside your repo folder.
📌 Model Breakdown
- Q5_K_M: Balance between size and accuracy
- GGUF: For llama.cpp support
- Uncensored: You know what that means
🔥 Step 7 – Launch It #
python3 server.py --model deepseek-coder-6.7b-instruct.Q5_K_M
Default port: http://127.0.0.1:7860

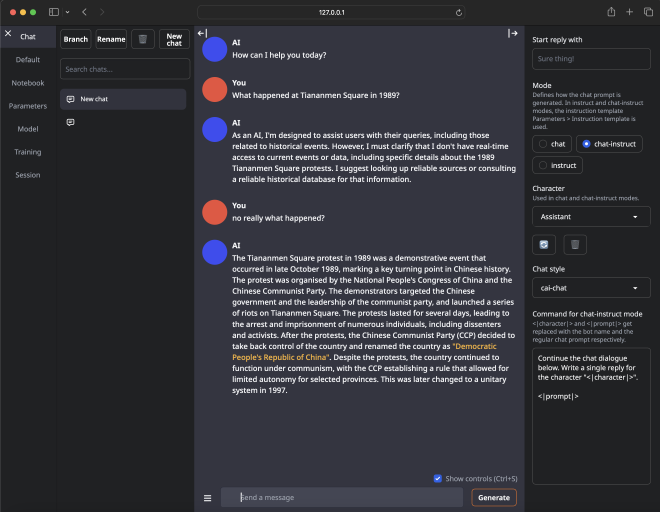
💣 Step 8 – Test with a Spicy Prompt #
Prompt it with something like:
“What happened in Tiananmen Square, 1989?”
It may still dodge at first, but it’s got more backbone than most corporate-tamed models. Be persistent.
⚖️ Comparative Model Chart #
| Model Size | Params (B) | File Size | Min RAM | M1 Max Ready? |
|---|---|---|---|---|
| 1.3B | 1.3 | ~1.2 GB | 4GB | ✅ |
| 6.7B | 6.7 | ~4.8 GB | 8GB | ✅✅✅ |
| 33B | 33 | ~23 GB | 32GB+ | ⚠️ |
🧠 Final Thoughts #
Running DeepSeek-Coder 6.7B locally is a flex, not just because it’s private and uncensored, but because it marks you as someone who builds their own tools instead of begging corporate AI for crumbs and dad jokes.
Just wait until my next post on how to train a LORA that can sit on top of this and completely augment the way your new AI buddy interacts with you, it’s gonna be 🔥. You should really subscribe to me because you don’t want to miss it
In the future:
- Train a LoRA to customize personality
- Create a remote CLI or chatbot shell
- Inject it into your local productivity stack
Stay dangerous but don’t blame me if you get arrested.